- Applicants - On Hire employment applicants
- Members - On Hire Personnel
- Candidates - Permanent Placement employment applicants
- Professionals - Clients staff
- Staff - Internal Agency Staff
Range of Documentation
- Credentialing
Qualifications, Registrations, Certificates and Licences relevant to the role being undertaken. Stored in the data base and available to Clients as defined by Agency. Often require expiry dates.
Recruitment Officer, who also verifies the documents (Coming Soon – Ability to be entered by Members and Applicants).
- Performance
Positive or Negative (Complaint) performance appraisal submitted by Client or Member online, that has the ability to be edited, added and responded to.
Generally submitted by the Client and managed by the Relationship Manager.
- Payroll
Timesheets, Receipts and/or Travel Documentation
Submitted online by Member by Portal or App or entered by Payroll Staff from App
- Personal Details
Education, Training, Resumes, Financial and Medical records
Generally entered by the Member or Recruitment Officer.
- Shift Information & Tasks
Once off information or tasks for an individual shift, that may require completion and return.
Generally entered by Client from their portal or Allocations Officer from their interface.
Returned / completed document entered by Member from their portal.
- Location Information & Tasks
Continuous information or instructions Members at every shift at a Client's Location, which may require completion and return.
Generally entered by Relationship Manager / Allocations Officer on behalf of Client.
- Location Records
Service Agreements, OH&S Assessments and Tender Documents
Generally entered by Relationship Managers.
Static & Dynamic Storage
The entireHR is designed to offer both Static and Dynamic storage of documents.
Static storage is where Documents that are entered into the system once off for reference or archiving. Such as Driver Licences or Client Tender Contracts.
Dynamic storage is where Documents are entered into the system for transmission to or editing by either Members, Clients and/or Staff. Such as Timesheets or Task Forms.
Document Masters
Unlike traditional programs that are hard coded and require computer technicians to apply even the smallest changes, entireHR has been developed using the principal of Masters that can be edited by the end users. As such there are specific Masters for Documentation whereby the Type, Description and Storage locations can be edited by the User.
- Document Master
- Document Storage Master
List of Files where Documents are stored.
Document Master
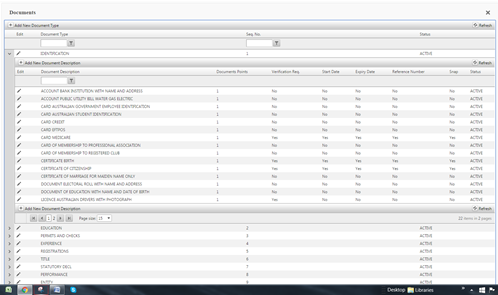
The Document master displayed below allows you to firstly create your Documents Types then add the Document Descriptions to each Type.

Sequence Level
When listing the Document Type you will note that there is provision for a Sequence Level. By default a software program will list items in alphabetical order, the inclusion of the Sequence Level allows you to depict the order in which you wish the various types of Documents to appear.
Documents Parameters
In the Document Description field there are a several parameters that can be applied to individual documents to ensure correct credentialing:
- Document Points
To provide a numerical value against individual documents.
- Verification Required
To ensure that a Document is Verified by a internal Staff
- Start Date & Expiry Date
To ensure currency of registration
- Registration Number
To ensure Registration numbers are obtained
Recruitment Documents
Applicants & Members Personal Details & Credentialing Document Storage
All Documents relating to Members are stored in the Members Profile in their Document Tab. Documents can be updated into their profile from the Staff App and directly from this Tab by using the Upload feature (Coming soon - from the Applicant, Members and Clients Interface).
Documents are stored under their Type and Description as defined from the Document Master.
Documents can only be Deleted from this Tab, but they can be “overwritten” using the Staff App.
Process of Uploading Members Documents
With both the Staff Interface (displayed below) and the Staff App, the first step is to select the applicable Applicant or Member, then choose the Title of the Document (displayed below is Application Details) then tick the Document Classification that you are inputting. The interface allows you to only input Documents that are already on your computer or desktop, whereas the App also enables you to take a photograph of the document and enter it instantly into the system.
Documents Requiring Online Signatures & Confirmations
The entireHR system has the ability for Signatures to be entered Online from Applicant and Member Interfaces plus the Apps. In the case of the Interface the User is invited to Sign by using their mouse. In the case of the App the User can Sign by using the touch screen.

Online Signatures can be defined for inclusion with the submission of Timesheets (Default setting is no signature) If a Signature is required for Timesheets this can be activated from the Client's profile.
Documents with System Mandatory Verification
Designed into the system are two Mandatory Verifications to guarantee that no Personnel is employed without personal Verification of their primary Identity and core Qualification Documentation by the internal Staff of an Agency.
As part of the Recruitment process the system requires that an Identification Number and Qualification Details, be inserted in the Recruitment Verification Tab, by an Internal Staff Member, generally the Recruitment Officer.
Before these details can be entered, the Identity and Qualification Documents must be previously entered into the system. Following which the internal Staff is invited to inspect the Documents by clicking on the 'View Document' button, then to note in the Verification box a reference to the Document they have viewed.
The design philosophy behind this process is to absolutely guarantee that internal Staff have witnessed the primary Identification and core Qualification documentation, and that these Documents are safely stored in the system. As a safe guard the system is designed not to allow an Applicant to be made Active for deployment unless these fields have been completed.
It is important to mention here that the concept of the Verification Notes here is to write something that relates to the Documents that the Staff have viewed. This confirms to the organisation that they have actually viewed the Documents in question. Just writing "Viewed by Jon Snow" is irrelevant here as the system records who has Verified the Documents in question. Instead what is required here for appropriate management, is a notation of what they have seen on the Documents, to prove they have personally inspected it.

Quick Access to Document Storage
The Personnel Card is designed to provide quick access to an Applicant or Members Profile and a snapshot of their current status, in that there are numerous links to various parts of their file. In this case by clicking on Documents you will be taken immediately to their Document Storage Tab.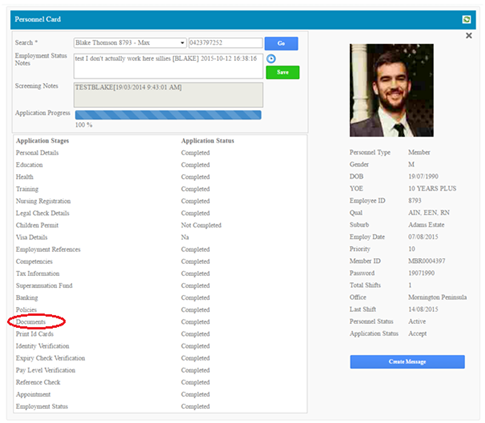
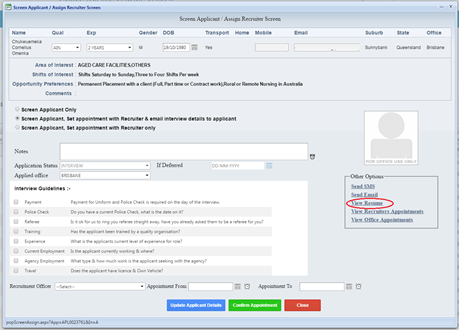
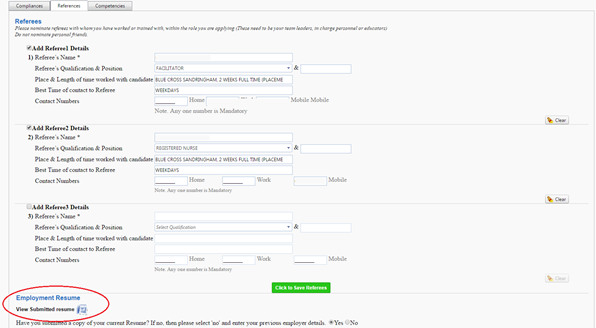
Viewing Documents - Resumes
Applicants and Candidates Resumes can be view in various places though the Recruitment Process. Including the following Screen Applicant pop up, Referees Tab and Screen & Sort Tab by clicking on the letter 'R' for Resume.

Client Documents
Client Profile - Location Based Information
In the Client Details Document Tab Documents can be entered and stored against individual Clients.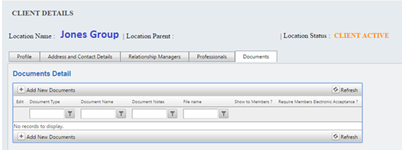
Open & Closed Documents
These Documents can as required be made visible OPEN to the Members or invisible to Members CLOSED. The default setting for all Documents is Closed.
Open Documents can be seen by the Members from their App when they are attending at the particular Location. It is important to note that these Documents are only visible to Members when they are Booked for the Location and Members who are not Booked cannot access these Documents. Open Documents are ideal for Information or Forms that have to be continuously seen by Members when working at a particular Location.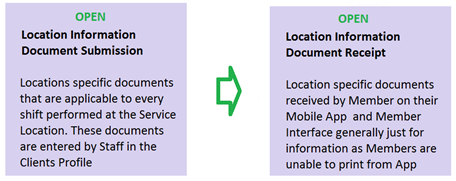
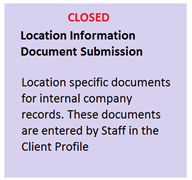
Closed Documents can only be seen by internal Staff and are not visible to Members or Clients. Closed Documents are ideal for the storage of Information.
Open Client Documents
The purpose of Open Documents for a Client Location is to provide continuous information or instructions for Members for every shift worked at a particular Client's Location. This information is generally entered by the Relationship Manager or Allocations Officer on behalf of the Clients. This option is to provide Members with information that is required on a consistent basis, not just once off. This information may relate to core duties that have to be performed, OH&S procedures, or other relevant onsite information. These documents are entered in the Client's Document Tab.
Closed Client Documents
The purpose of a Closed Client Location Document is to provide for the Storage of all Service Agreements, Tenders, OH&S Audits and other such administrative information.
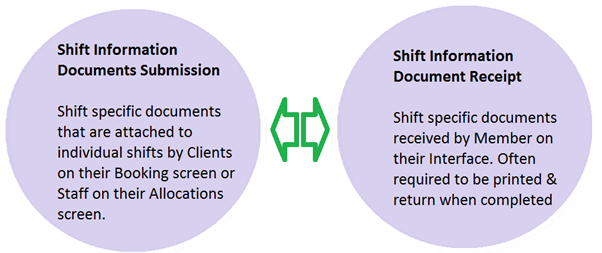
Show to Members Option
When Adding a new Document in the Client Tab you will notice the option to select "Show Members" on the selection of this, Documents will be displayed to the Members on both their Member Portal and Apps.
Members Electronic Acceptance
You will note above the tick box of "Require Members Electronic Acceptance" this feature is being released in August 2016. The purpose of this is to provide the option for Members to sign the particular Document online. For example a Member may after completing an OH&S Audit electronically sign the document online and return it online.
Staff Adding Location Documents
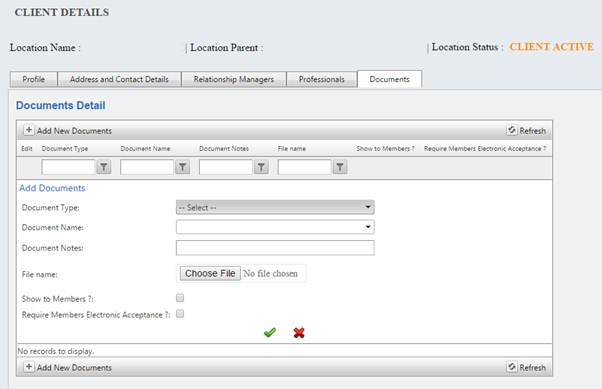
The below screen shot displays where these Document Notes are presented.

Staff Adding Shift Documents
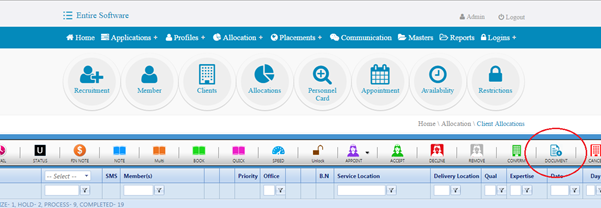
Clients Adding Shift Document
Your clients can also enter Documents that relate to your Shifts from their own Client portal. Firstly the Shift or Shifts will need to be entered into the system. Then go into the Current Booking Tab where you can select the Shift or Shifts concerned and click on the Upload Document Button.
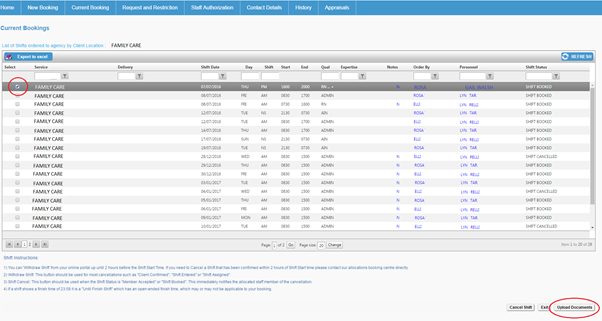
Clients Uploading Shift Document
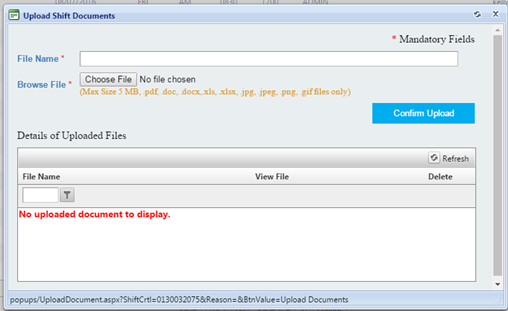
Clients will then be presented with the Upload Shift Documents pop up displayed below where theyo are asked to write in a File Name and Browse Files. You will note that Documents can be Deleted if no longer required.
Preset Email Distribution of Documents
Allocations Screen Distribution of Documents
The Client Allocations screen has incorporate within it the ability to distribute emails from preset templates. Predominately designed to forward a preset collection of documents to a Client to support a Booking that has been placed. This function can be used to send emails from a template to any person. To access this feature you click on the Member Status column, as displayed in the Red rectangle below and the Emailer pop up appears.
Preset Emails to Clients
Primarily designed to facilitate the provision of numerous Documents to Clients at once, particularly if required for specific shifts. This function is as mentioned accessed by clicking on the Status column.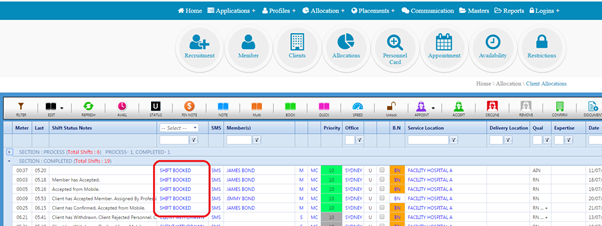
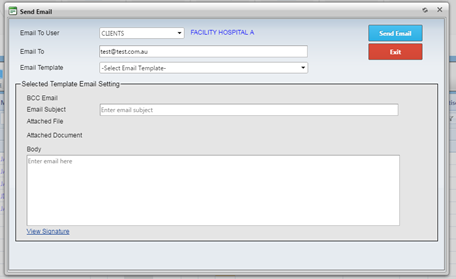
Link between Email Template and Shift / Client / Member
The whole concept of this function is to be able to transmit numerous documents at once. For example if say a Client Service Agreement and Members Resume is required by the Client when a shift is Booked, and these items are specified on the Template, then the system will provide the Servicer Agreement attached to that Client named and Resume of the Members Resume Booked for that shift. Email Template Type and Format are accessed via the Main Masters.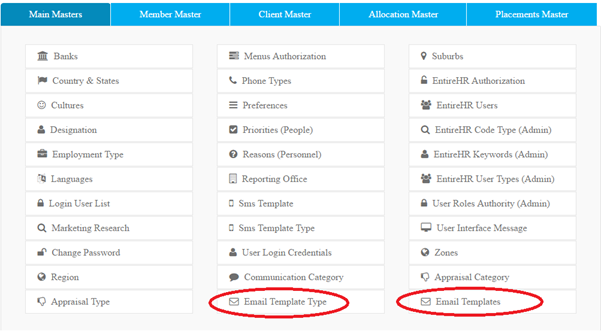
Email Template Type Master
The Template Type Master allows you to nominate whether the Email is to be forwarded to the Client, Professional or Member, and create a name for the Individual Template. Nominated below a Client with the name of Rural MP Placement Documents, which would be used for forwarding a range of Documents required to accompany the Placement of a Doctor in a Rural setting.

Email Templates Master
The Email Template is where you actually create the individual Email message and select which Document/s that you wish to send from either the system or your own Data base.
Add New Email Template
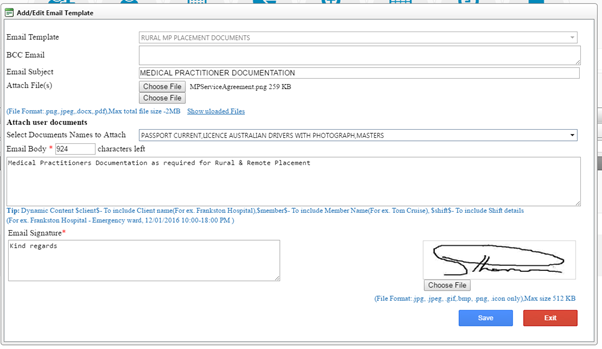
By clicking on the button Add New Email Template a pop up is provided where you can actually create your email message and attach the Documentation.
First you select the Template name that you have already created, here is Rural MP Placement Documents, this is really your internal name. The you define an Email Subject title, that is really your external name for the Email.
Following this you have the opportunity to Attach up to 2 files from you company Data base. Here you will note that the file MP Service Agreement has been attached.
The next step is to Attach the Documents that are contained within the entireHR system. Here you are able to select a range of Documents. Here we have nominated Member Documents such as Passport and Drivers Licence. The system will on transmission of the Email, source and attached the Passport and Drivers Licence of the particular Doctor that is named within the Booking.
Following is a free field of Notes, that may include requests to complete and return various parts of the Documentation.
Email signature field is actually just the wording that you would like at the base of the message, with the last Choose File permitting the Uploading of a Signature or maybe Company Logo.
In a nutshell the main purpose of this Preset Emailer function is to enable the rapid transmission of numerous Documents instantly, a huge time saver for documents that are generally required on a consistent basis.